Having recently purchased a 3D printer Ive been creating various 3D models and cases for my projects using FreeCad. The topic of this project is an original design for a 3D printed Morse Code Paddle using PLA.
This paddle was designed as a replacement for a paddle I had built several years ago which used a strip of printed circuit board (PCB) as the main paddle arm. The flexibility of the PCB provided the springiness for the arm movement and the tension was determined during the design by the paddle arm’s width. The problem was that the tension was fixed and there was no control over its adjustment.
Design
This new design uses Neodymium disc magnets rather than the usual springs to provide centering and tension of the paddle arm. This idea is not new and there are a number of examples of magnetic-tension paddles available today.
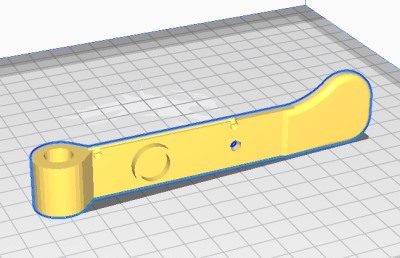
The Morse paddle consists of a 3D printed base, paddle, magnet mounts and a top case. The paddle pivots on a round vertical stud and is held in place with a cap. The vertical mounts for the contacts and magnets are built into the base, as is the rear panel for the 3.5mm output socket. As can be seen from the 3D drawing, there are two Neodymium disc magnets mounted in cavities on each side of the paddle arm and another two mounted in separate plastic caps. These separate magnets are polarised so as to repulse the magnets in the paddle arm. The magnet caps are threaded onto brass screws which allow adjustment of the paddle tension by increasing or decreasing the space between the magnets.


The electrical contacts consist of brass bolts mounted at the front and a shortened brass bolt threaded through the paddle arm. Wiring for the outer contacts pass through holes in the base where slots lead the wires to the rear panel socket. The central wire for the paddle arm feeds through a groove under the paddle arm and exits at the rear near the pivot point. This ensures minimum movement to the wire so that it poses no additional resistance to the paddle movement.
A 3.5 mm stereo audio socket is mounted on the rear panel. Holes in the base near the rear panel allow the wires from underneath to exit for termination on the socket.Parts List
The following additional parts will be required.
| Description | Qty | Source |
| 3/16″ x 18mm Brass Bolts & Nuts | 5 | Bunnings (Zenith EAK1620) |
| Neodymium Disc Magnets (12mm dia x 3mm thick) | 4 | Bunnings (Everhang #73506) |
| Solder Lugs 17.6 mm | 3 | Jaycar (HP1350) |
| 3.5mm Stereo Chassis Socket | 1 | Jaycar (PS0132) |
| Hookup Wire | ~450mm | |
| Printed parts as described below | Use DOWNLOAD link below |
Printed Parts
The plastic parts were printed on a Creality Ender 3D printer using standard PLA. The file download below consists of 5 stl files. The items should opened one-by-one in your slice program and printed in the following orientation:


Note that the three caps (left/right magnet caps and the pin top-cap) can be opened into your slicer one-by-one, orientated as shown and printed in the same session. After printing all parts, trim off excess plastic and clean up all edges. Trial fit the paddle onto the base. You will probably need to trim excess plastic from the inside edges of the paddle mounting hole. If the paddle still binds on the mounting pin, lightly sand the mounting pin until the paddle moves without binding. Do not over-sand otherwise the paddle fit will become sloppy. The tolerances are deliberately close so as to minimise any excess sideways moveme
The 3D Printer files are available in .stl format from the link below.
Assembly
Assembly begins by carefully tapping 3/16″ threads into the holes marked in the drawing below. These are to accommodate the 3/16″ brass bolts. Refer to the assembly photos below.


Assemble the front contact bolts first. Thread a brass nut onto one of the brass bolts, followed by a solder lug and move them along the thread towards the bolt head. Create two more of these assemblies (total 3).
Cut three 150mm lengths of hookup wire (preferable different colours). Solder one end of each wire to each of the three solder lugs.
Taking the printed base, thread two of these bolt assemblies into the two front studs from the outside until about half the bolt has been threaded.
Take the paddle and locate the wire slot along the bottom edge. With the slot facing downwards, screw the third bolt assembly into the threaded hole in the paddle from the right hand side so the solder lug aligns with the front wire entry hold on the bottom right edge. Thread a nut onto the other side so that about 1mm of bolt is protruding past the nut, then back the bolt off until the nut is firmly against the paddle. Now firmly tighten the nut on the RH side (with the solder lug) against the paddle. Use a hacksaw to cut the excess bolt about 1mm past the nut. You should now have a brass thread in the paddle with a nut tightened on either side and a small amount of brass thread protruding from each nut. File both ends of the thread to get a smooth surface.
Feed the wire through the entry hole in the bottom of the paddle, along the slot and out through the exit hold. The wire should be pressed fully inside the slot so it cannot touch the base when the paddle is installed. Fix with glue if necessary.
Place a magnet into one of the cavities on the paddle. Place another magnet into the cavity on the other side orientated so that they attract each other. The magnets should stay there under their own power.
Screw the last two brass bolts into the remaining rear studs until the thread just appears on the other side. Press the flat surface of one of the magnet caps against the stud, in line with the exiting thread and continue threading the bolt so that it threads into the cap (this method help to keep the cap aligned both horizontally and vertically with the mounting stud). Hold the cap firmly and continue screwing the bolt into the cap until the thread is flush with the inside of the cap. Repeat the same on the other side.
Before mounting the last two magnets into the magnet caps, they must be orientated so they will both repel the magnets in the paddle. Holding the paddle in its installed orientation, bring one of the magnets near the RH side of the paddle and orientate it so it repels the paddle. Use a pen to mark the ‘outside’ of the magnet with an R (for right). Do the same for the left hand side, marking an L on the outside of the left magnet. Glue the magnets into the associated magnet caps so the L and R are inside the cap. Once the glue has dried you should be able to slide the paddle into place on the base and it will sit balanced between the two magnets. Fit the paddle cap and fix with a small self tapping screw. Adjust the screw tension so the paddle moves freely with minimum slop.
Wiring
The paddle should be wired as shown below. Pass the two outside wires from the contact studs through the holes in the base and along the grooves underneath before feeding them out through the holes near the socket. Trim the wires as necessary and solder them to the contact pins on the stereo socket. The wire from the paddle goes to the socket’s ground pin. Ensure the paddle wire does not restrict the movement of the paddle. A small amount of excess wire coiled into a couple of turns gives plenty of freedom and keeps the wire tidy.


Operation
When connected to the radio, pressing paddle-left should give Dahs while paddle-right should give Dits. If the operation is reversed and you don’t have an option to reverse it in your radio’s CW settings, simply reverse the two outside wires on the paddle. The centre paddle wire should always be connected to the ground point on the socket.
Adjust the two magnet-bolts to alter the tension of the paddle. Once the tension is close, adjust the left or right bolt to align the paddle in the centre of the key.
Adjust the two front contact-bolts for the desired amount of paddle movement. There are also slots to allow the paddle to be adjusted with the case in place.

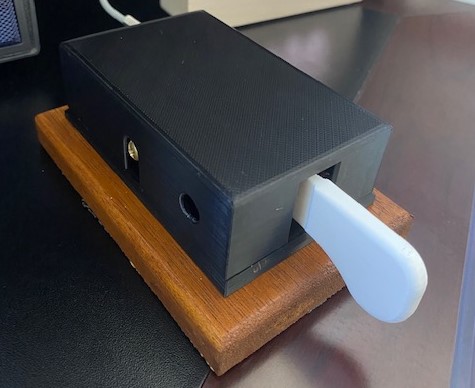
When finished, fit the case. There are two mounting holes in the base and matching mounting studs inside the case with 4mm holes. Use self tapping screw of the desired length to fix the case to the base. The same screws can also be used for mounting a wooden base. For mine, I cut and sanded a wooden block for the main base and applied a stain. A non-slip pad applied to the bottom of the base keeps it in place when in use.